AWS VPC: The Fun Playbook! ☁️
This blog will guide you through understanding six crucial aspects:
What is a VPC in AWS?
With Amazon Virtual Private Cloud (Amazon VPC), you can create a special virtual network for your AWS stuff. It's like having your own private space in the cloud, similar to how you'd organize things in your own computer room. The cool part is, you get all the advantages of AWS's big and flexible system.
What makes AWS VPC advantageous?
- Isolation: AWS VPC allows you to create a private, isolated section of the AWS Cloud, which is beneficial for enhancing security and privacy. You can control access to resources within the VPC, making it function like your private network in the cloud.
- Custom Networking: You have the flexibility to design your own virtual network, including the selection of IP address ranges, creation of subnets, and configuration of route tables. This customization enables you to organize your resources according to your specific requirements.
- Security: AWS VPC provides robust security features, including network access control lists (ACLs) and security groups, allowing you to define and control inbound and outbound traffic to your resources. This enhances the overall security posture of your applications.
- Connectivity Options: AWS VPC supports various connectivity options, allowing you to connect your VPC to the internet, on-premises data centers, or other VPCs. This flexibility facilitates hybrid cloud architectures and seamless integration with your existing infrastructure.
- Scalability: Leveraging AWS VPC enables you to scale your resources easily. You can launch new instances, add more subnets, and expand your network infrastructure as your business grows, without the need for significant manual intervention.
- Resource Management: With AWS VPC, you can efficiently manage your cloud resources. The ability to group and organize resources within the VPC simplifies resource management, making it easier to locate, monitor, and control your applications.
- Compliance: AWS VPC provides features that aid in achieving compliance requirements. You can implement network controls and security measures necessary for adhering to regulatory standards relevant to your industry.
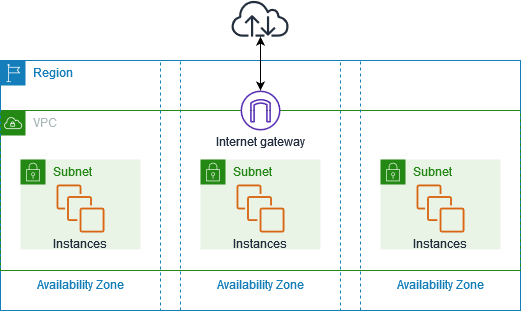
How does an AWS VPC look like?
This is an example diagram from Amazon docs showing an example of a VPC that has one subnet in each of the Availability Zones in the Region, EC2 instances in each subnet, and an internet gateway to allow communication between the resources in your VPC and the internet.
Important terms you should know about:
- AWS Regions & Availability Zones: Amazon cloud computing resources are hosted in multiple locations world-wide. These locations are composed of AWS Regions, Availability Zones, and Local Zones. Each AWS Region is a separate geographic area. Each AWS Region has multiple, isolated locations known as Availability Zones.
- Subnets: A subnet is a range of IP addresses in your VPC.
- Internet Gateways: Components which provide two-way public connectivity to applications running in AWS Regions and/or in Local Zones.
- Security Groups: A security group controls the traffic that is allowed to reach and leave the resources that it is associated with.
- Network ACL (Access Control List): Allows or denies specific inbound or outbound traffic at the subnet level.
- Route Tables: A route table contains a set of rules, called routes, that determine where network traffic from your subnet or gateway is directed.
- NAT gateways: A NAT gateway is a Network Address Translation (NAT) service. You can use a NAT gateway so that instances in a private subnet can connect to services outside your VPC but external services cannot initiate a connection with those instances.
-
IPv4 CIDR block: An IPv4 CIDR block is a way of
describing a range of IP addresses. Imagine IP addresses as
numbers for different devices on a network. CIDR notation helps
us group these numbers efficiently.
For example, "192.168.0.0/24" means that we are talking about a range of IP addresses starting from "192.168.0.0" to "192.168.0.255." The /24 part tells us that the first 24 bits of the address are for the network, and the remaining 8 bits are for individual devices on that network.
Now, it's time to create your own customized VPC!
Here's a list of what components you need to make this happen:
-
A new VPC, we will call it
my-cool-vpc. -
A new key pair
my-cool-kp. -
2 security groups:
-
public-sg: This will be attached to Internet facing resources. -
private-sg: This will be attached to private resources.
-
-
2 EC2 instances:
web-server.database-server.
-
2 subnets:
public-subnet.private-subnet.
-
2 route tables:
default.private-rt.
-
An Internet Gateway, let's call it
my-cool-ig. -
A NAT Gateway, let's call it
my-cool-natgw.
Simply follow these steps to create your own VPC.
-
Let's start by create key pairs
my-cool-kp.

-
Let's then create the VPC instance
my-cool-vpcwith a CIDR of10.0.0.0/16.
This will also create the default Route Table for the VPC, rename it todefault.
-
Now we're going to create 2 subnets:
-
10.0.1.0/24:public-subnet. -
10.0.2.0/24:private-subnet.

-
-
Next, we create the 2 security groups:
-
public-sgwill have 2 inbound rules:- Port: 22 (SSH) - Source: 0.0.0.0/0 (Everywhere)
- Port: 80 (http) - Source: 0.0.0.0/0 (Everywhere)
-
private-sg: will have 1 inbound rule-
Port: 22 (SSH) - Source: 10.0.1.0/24
(
public-subnet)
-
Port: 22 (SSH) - Source: 10.0.1.0/24
(
-
-
Next, we will proceed to establish a route table specifically
for the private subnet.
-
Let's now give our public subnet access to the Internet, we will
do that in 3 easy steps:
- Creating the Internet Gateway
- Attaching the Internet Gateway to our VPC
- Define a route to the Internet Gateway in the default route table
-
Now, we need our resources in the private subnet to able to
access the Internet, but no resources outside of our VPC can
access them.
We can acheive that by:- Creating a NAT Gateway in the public subnet.
- Adding a route to the NAT Gateway in the private route table.
-
Next, we have to associate each subnet with the correct route
table as following:
-
public-subnet: associate it with thedefault(which can be accessed from the Internet) route table. -
public-subnet: associate it with theprivate-rt.
-
Testing your VPC
-
Create an EC2 instance
web-server, attach it topublic-subnet, enable Auto-assign public IP and selectpublic-sgfor the security group. -
Create an EC2 instance
database-server, attach it toprivate-subnet, enable Auto-assign public IP and selectpublic-sgfor the security group.
ℹ️ Important:
Assigning a public IP address and linking it with the
public-sg may seem illogical, but this is solely
for testing purposes.
After completing the testing phase,
terminate this instance and deploy a new one without a public IP
address, attaching the private-sg to it.
Let's do some tests now:
-
Is
webserveraccessable from the internet: you should be able tosshyourwebserverfrom the internet. ✅ -
Is
database-serveraccessable from the internet: you should not be able tosshyourdatabase-serverfrom the internet. ✅ -
Is
database-serveraccessable frompublic-subnet: you should be able tosshyourdatabase-serverfrom thewebserver. ✅ -
does
webserverhave Internet access: you should be able to update your EC2 isntance usingsudo yum update -y. ✅ -
does
database-serverhave Internet access: you should be able to update your EC2 isntance usingsudo yum update -y. ✅
Summary
And there you have it, VPC pros! Your AWS VPC adventure awaits - keep those cloud vibes strong and enjoy crafting your virtual networks. Until next time, happy cloud surfing! 🚀☁️